Securing OpenAI's MCP Integration: From API Keys to Enterprise Authentication

Imagine this scenario: Your OpenAI-powered customer service bot exposed sensitive customer data because someone intercepted its API communications. Or worse, a compromised client accessed your payment processing tools because your authentication system could not distinguish between different permission levels. These are not theoretical risks; they are real vulnerabilities that emerge when AI systems meet enterprise data without a proper security architecture.
The rush to implement AI has created a dangerous blind spot. While developers race to build intelligent applications with OpenAI's powerful models, many rely on simple API keys that offer as much security as leaving your house key under the doormat. When your AI assistant can access databases, create support tickets, or process payments, you need protection that matches the sensitivity of these operations.
This comprehensive guide demonstrates how to transform OpenAI's standard API integration into an enterprise-grade secure system using OAuth 2.1, JWT validation, and TLS encryption. We will build a production-ready implementation that protects your AI tools with the same rigor you would apply to your most critical systems.
Understanding the Technology Stack
Before diving into implementation, let us clarify the key technologies that will form our security foundation:
Model Context Protocol (MCP): An open protocol that enables AI models to interact with external tools and data sources. Consider MCP as the bridge between OpenAI's language models and your business systems. It allows your AI to do things rather than talk about them.
OAuth 2.1: The latest evolution of the OAuth authorization framework, providing secure, token-based access control. Unlike static API keys, OAuth issues temporary tokens with specific permissions that you can revoke instantly if compromised.
JSON Web Tokens (JWT): Self-contained tokens that carry user identity and permissions in a cryptographically secure format. JWTs enable distributed systems to verify permissions without constant database lookups.
Transport Layer Security (TLS): The cryptographic protocol creates an encrypted tunnel for all communications, preventing eavesdropping and tampering with data in transit.
Note: We cover the server side of the MCP equation in depth in the article: Securing MCP: From Vulnerable to Fortified. OAuth, TLS, and JWT server-side MCP handling is covered.
Together, these technologies create multiple layers of defense, which security professionals call "defense in depth." Even if one layer is compromised, others continue to protect your system.
The Security Challenge: Why API Keys Are Not Enough
OpenAI's standard implementation uses a simple API key for authentication. While this works perfectly for personal projects or demos, it creates serious vulnerabilities in production environments:
# The dangerous simplicity of API keys
client = OpenAI(api_key="sk-abc123...")  # One key to rule them all
This approach has several critical weaknesses. First, anyone with this key has full access to all capabilities. Limiting permissions or creating different access levels for various use cases is impossible. Second, if the key is compromised, you must rotate it everywhere it is used, potentially breaking multiple systems. Third, there is no built-in expiration or automatic rotation, meaning compromised keys can remain active indefinitely.
Consider what happens when your AI assistant needs to perform sensitive operations:
# Without proper security, any compromised client could:
customer_data = await get_customer_info("12345")  # Access any customer
payment = await process_payment(customer_id, amount)  # Process any payment
admin_action = await delete_user_account(user_id)  # Perform admin operations
The solution is not to avoid giving AI these capabilities; it is to secure them properly. That is where our enterprise security architecture comes in.
Security Architecture Overview
Our secure architecture implements multiple checkpoints between the OpenAI client and your business systems. Each layer serves a specific purpose, creating a comprehensive security posture that protects against various attack vectors.
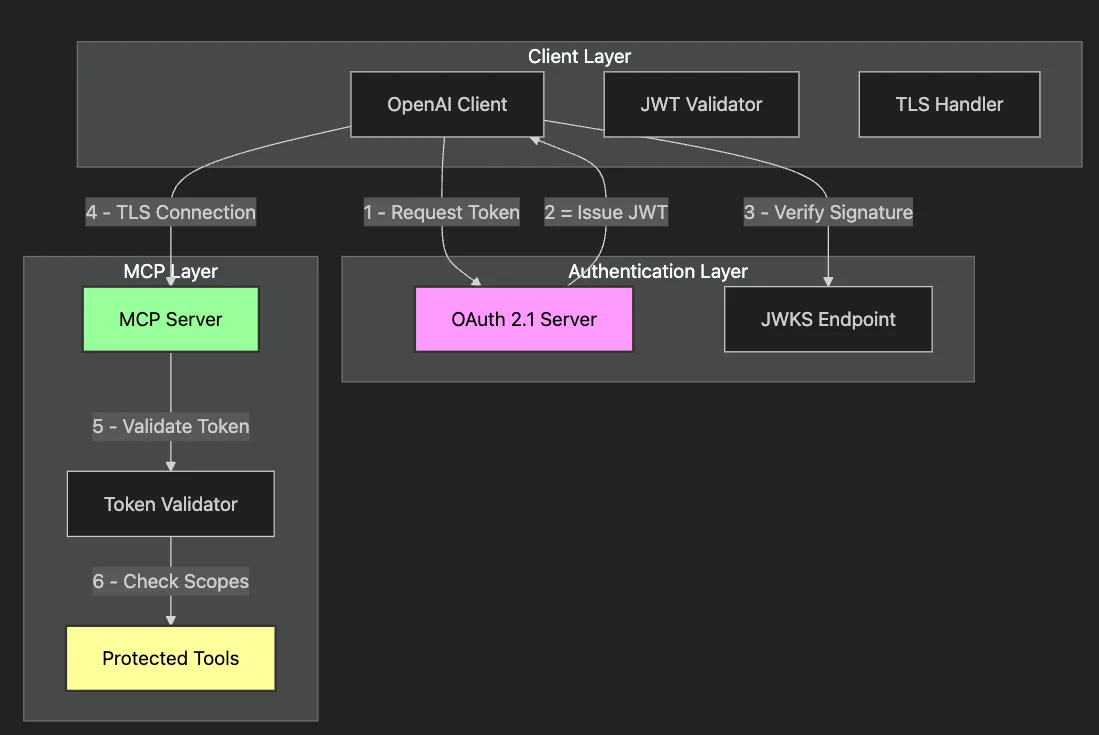
This architecture ensures that:
- Authentication happens before any tool access: No anonymous requests reach your business logic.
- Permissions are granular: Each token carries specific scopes limiting which tools can be accessed.
- Validation occurs at multiple points: Both client and server verify credentials independently.
- All communication is encrypted: TLS prevents interception and tampering.
Let us build this system step by step, starting with how OpenAI's tools integrate with MCP.
Understanding OpenAI's MCP Tool Architecture
OpenAI's function-calling feature provides a natural integration point for MCP tools. When you give OpenAI a tool definition, the model can decide when and how to use it based on the context of the conversation. However, this flexibility means we must carefully control the available tools and who can execute them.
Here is how OpenAI tools map to MCP with security metadata:
# Standard OpenAI tool definition enhanced with security metadata
openai_tool = {
    "type": "function",
    "function": {
        "name": "get_customer_info",
        "description": "Retrieve customer information by ID",
        "parameters": {
            "type": "object",
            "properties": {
                "customer_id": {
                    "type": "string",
                    "description": "The customer's unique identifier"
                }
            },
            "required": ["customer_id"]
        },
        # Security metadata - not sent to OpenAI but used locally
        "x-oauth-scopes": ["customer:read"]
    }
}
The security metadata tells our system what permissions are required to execute each tool, creating a critical security checkpoint. Before OpenAI can use a tool, we verify that the current session has the necessary permissions.
Implementing OAuth 2.1 Authentication
OAuth 2.1 replaces static API keys with dynamic, scoped tokens. Consider replacing a master key with temporary, purpose-specific keys that expire automatically. Let us implement the token acquisition flow:
async def get_oauth_token(self) -> str:
    """Obtain OAuth access token using client credentials flow."""
    current_time = time.time()

    # Check if we have a valid cached token to avoid unnecessary requests
    if self.access_token and current_time < self.token_expires_at - 60:
        return self.access_token

    # Request new token with specific scopes
    response = await self.http_client.post(
        self.oauth_config['token_url'],
        data={
            'grant_type': 'client_credentials',
            'client_id': self.oauth_config['client_id'],
            'client_secret': self.oauth_config['client_secret'],
            'scope': self.oauth_config['scopes']  # Only request needed permissions
        }
    )

    # Parse and cache the token
    token_data = response.json()
    self.access_token = token_data['access_token']
    self.token_expires_at = current_time + token_data['expires_in']

    return self.access_token
This implementation incorporates several security best practices:
- Token Caching: We cache tokens to reduce authentication overhead while ensuring they are refreshed before expiration
- Early Refresh: The 60-second buffer prevents edge cases where tokens expire mid-request
- Scoped Access: We request only the permissions needed for our use case
- Secure Storage: Credentials come from environment variables, never hardcoded
The configuration structure keeps sensitive data organized and secure:
oauth_config = {
    'token_url': 'https://auth.example.com/token',
    'client_id': 'openai-mcp-client',
    'client_secret': os.environ.get('CLIENT_SECRET'),  # Never hardcode secrets
    'scopes': 'customer:read ticket:create'  # Only what we need
}
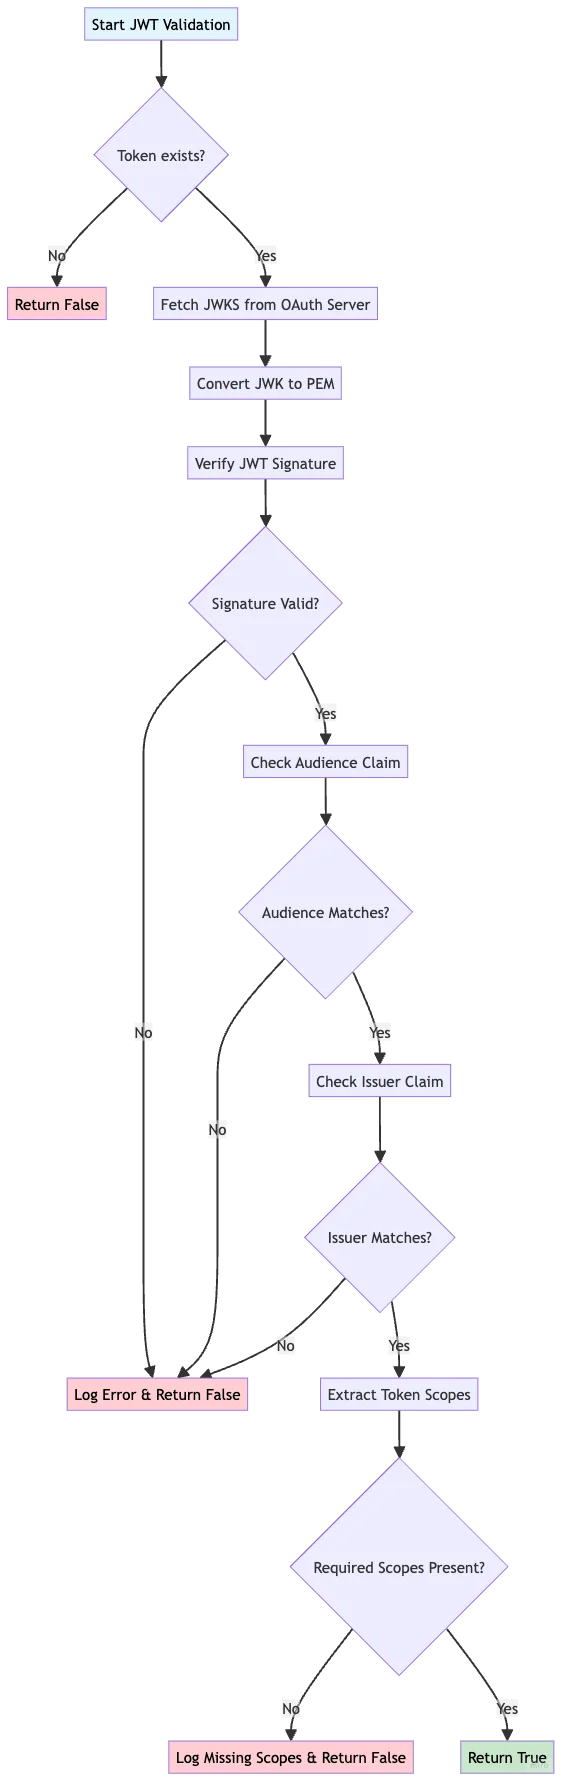
JWT Validation: Ensuring Token Authenticity
Getting a token is only the first step. We must verify its authenticity and check its permissions before using it. JWT validation with RS256 signatures provides cryptographic proof that the token came from our OAuth server and has not been tampered with.
async def _verify_token_scopes(self, required_scopes: List[str]) -> bool:
    """Verify JWT signature and check permission scopes."""
    if not self.access_token:
        return False

    try:
        # Fetch the OAuth server's public key for signature verification
        public_key_jwk = await self.get_oauth_public_key()
        if not public_key_jwk:
            print("Unable to fetch public key")
            return False

        # Convert JWK to PEM format for PyJWT
        from jwt.algorithms import RSAAlgorithm
        public_key = RSAAlgorithm.from_jwk(public_key_jwk)

        # Verify JWT with cryptographic signature validation
        payload = jwt.decode(
            self.access_token,
            key=public_key,
            algorithms=["RS256"],
            audience=self.oauth_config.get('client_id'),
            issuer=self.oauth_config.get('token_url', '').replace('/token', '')
        )

        print("JWT signature verification successful")

        # Check if token has required scopes
        token_scopes = payload.get('scope', '').split()
        has_required_scopes = all(
            scope in token_scopes for scope in required_scopes
        )

        if has_required_scopes:
            print(f"Token has required scopes: {required_scopes}")
        else:
            print(f"Token missing scopes. Has: {token_scopes}, Needs: {required_scopes}")

        return has_required_scopes

    except jwt.ExpiredSignatureError:
        print("Token has expired")
        self.access_token = None  # Clear expired token
        return False
    except jwt.InvalidTokenError as e:
        print(f"Invalid token: {e}")
        return False
This comprehensive validation ensures multiple security properties:
- Signature Verification: Confirms our OAuth server issued the token
- Audience Check: Prevents tokens meant for other services from being accepted
- Issuer Validation: Ensures the token comes from the expected authentication server
- Scope Verification: Confirms the token has permissions for the requested operation
TLS Configuration: Securing Data in Transit
Even with perfect authentication, data traveling over the network remains vulnerable without encryption. TLS creates an encrypted tunnel that prevents eavesdropping and tampering. Our implementation supports both development and production scenarios:
# Flexible TLS configuration for different environments
ca_cert_path = oauth_config.get('ca_cert_path', None)

# Support for development certificates (e.g., from mkcert)
ssl_cert_file = os.environ.get('SSL_CERT_FILE')
if ssl_cert_file and os.path.exists(ssl_cert_file):
    ca_cert_path = ssl_cert_file

# Create HTTPS client with proper certificate verification
self.http_client = httpx.AsyncClient(
    verify=ca_cert_path if ca_cert_path else True,  # Default to system CA
    timeout=30.0
)

# Custom factory for MCP connections
def custom_httpx_client_factory(headers=None, timeout=None, auth=None):
    """Factory ensuring all MCP connections use consistent TLS settings."""
    return httpx.AsyncClient(
        headers=headers,
        timeout=timeout if timeout else httpx.Timeout(30.0),
        auth=auth,
        verify=ca_cert_path if ca_cert_path else True,
        follow_redirects=True
    )
This configuration provides flexibility without compromising security:
- In development, you can use self-signed certificates for local testing.
- In production, system-trusted CAs are used automatically.
- All connections use the same TLS settings, preventing security gaps.
Building the Secure Connection
With our security components ready, we can establish a secure connection to the MCP server. This process orchestrates all our security measures:
async def connect_to_secure_mcp_server(self):
    """Connect to OAuth-protected MCP server with full security."""
    # Step 1: Obtain fresh OAuth token
    access_token = await self.get_oauth_token()

    # Step 2: Create secure HTTP transport with Bearer authentication
    http_transport = await self.exit_stack.enter_async_context(
        streamablehttp_client(
            url=self.oauth_config['mcp_server_url'],
            headers={"Authorization": f"Bearer {access_token}"},
            httpx_client_factory=custom_httpx_client_factory
        )
    )

    # Step 3: Initialize MCP session over secure channel
    read, write, url_getter = http_transport
    session = await self.exit_stack.enter_async_context(
        ClientSession(read, write)
    )
    await session.initialize()

    # Step 4: Discover available tools and their security requirements
    response = await session.list_tools()
    for tool in response.tools:
        self.tool_to_session[tool.name] = session
        # Map MCP tools to OpenAI format with security metadata
        openai_tool = self._convert_to_openai_format(tool)
        self.available_tools.append(openai_tool)

    print(f"Connected securely. Available tools: {[t.name for t in response.tools]}")
This connection process ensures that:
- We always use fresh, valid tokens.
- All communication is authenticated and encrypted.
- Tool discovery happens over a secure channel.
- Security metadata is preserved for runtime checks.
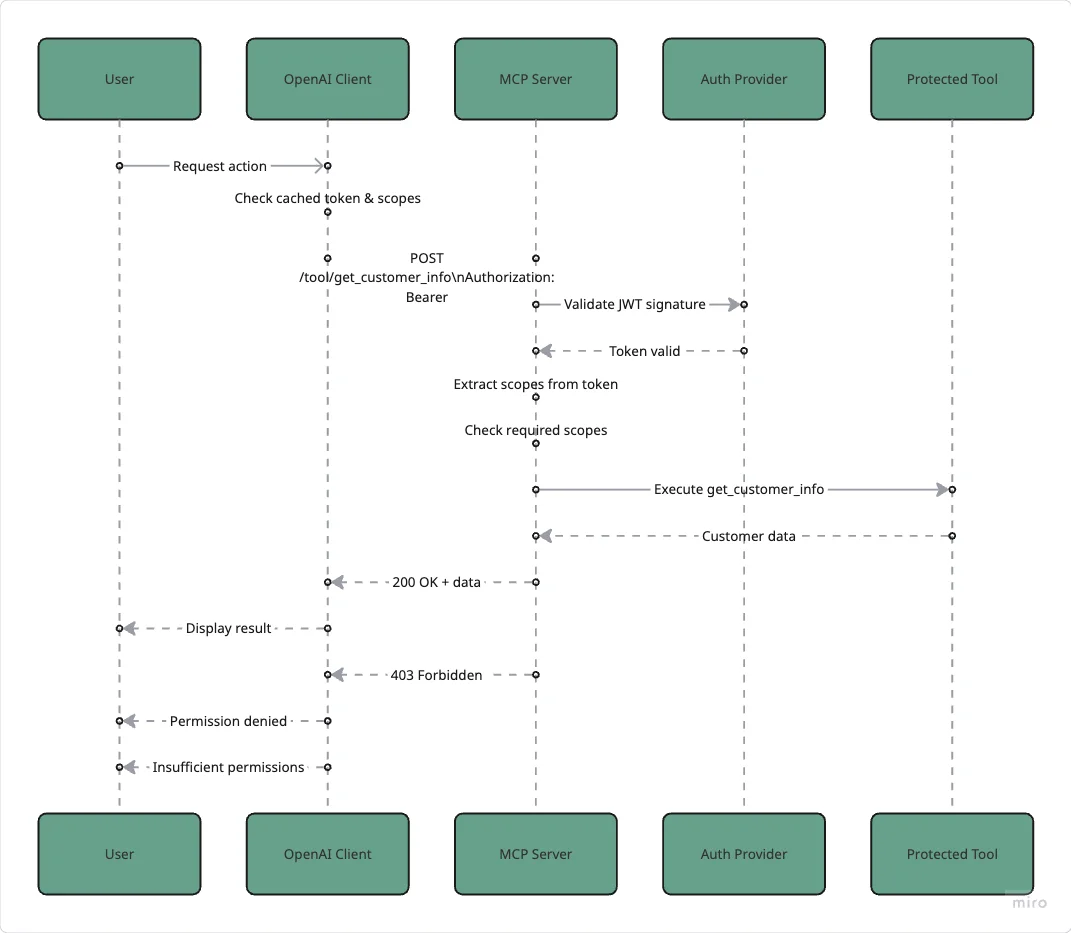
Executing Tools with Security Validation
When OpenAI decides to use a tool, we must validate permissions before execution. This represents our most critical security checkpoint:
async def call_mcp_tool(self, tool_call, tool_name):
    """Execute MCP tool with comprehensive security validation."""
    # Step 1: Determine required permissions for this tool
    required_scopes = self._get_required_scopes(tool_name)

    # Step 2: Verify JWT has required scopes
    if not await self._verify_token_scopes(required_scopes):
        raise PermissionError(
            f"Insufficient permissions. Token missing required scopes: {required_scopes}"
        )

    # Step 3: Get MCP session and prepare arguments
    session = self.tool_to_session[tool_name]
    tool_args = json.loads(tool_call.function.arguments)

    # Step 4: Execute tool over secure connection
    try:
        result = await session.call_tool(tool_name, arguments=tool_args)
        print(f"Successfully executed {tool_name}")
        return result
    except Exception as e:
        print(f"Tool execution failed: {e}")
        raise

def _get_required_scopes(self, tool_name: str) -> List[str]:
    """Map tool names to required OAuth scopes."""
    scope_mapping = {
        "get_customer_info": ["customer:read"],
        "create_support_ticket": ["ticket:create"],
        "calculate_account_value": ["account:calculate"],
    }
    return scope_mapping.get(tool_name, [])
This validation happens at the exact moment of execution, eliminating any time window where permissions might change. It is like checking someone's ID at the door of each room, not just at the building entrance.
The Critical Second Layer: Server-Side Validation
Client-side security provides a good user experience, but the fundamental rule of security is: never trust the client. The MCP server must perform its independent validation:
# Server-side tool implementation with security checks
@mcp.tool
async def get_customer_info(customer_id: str) -> Dict[str, Any]:
    """Get customer information with server-side security validation."""
    # Independent permission check on the server
    await _check_tool_permissions("get_customer_info")

    # Only after validation do we process the request
    try:
        request = SecureCustomerRequest(customer_id=customer_id)
        security_logger.info(f"Authorized access to customer {request.customer_id}")

        return {
            "customer_id": request.customer_id,
            "name": f"Customer {request.customer_id}",
            "status": "active",
            "last_order": "2024-01-15"
        }
    except ValidationError as e:
        security_logger.warning(f"Invalid customer request: {e}")
        raise

async def _check_tool_permissions(tool_name: str) -> None:
    """Server-side permission validation."""
    # Get the validated token from FastMCP
    access_token: AccessToken = await get_access_token()

    # Determine required scopes
    required_scopes = _get_required_scopes(tool_name)

    # Extract and verify scopes
    token_scopes = getattr(access_token, 'scopes', [])
    if isinstance(token_scopes, str):
        token_scopes = token_scopes.split()

    # Enforce permissions
    if not all(scope in token_scopes for scope in required_scopes):
        raise HTTPException(
            status_code=403,
            detail=f"Insufficient permissions. Required: {required_scopes}"
        )
This dual-validation architecture creates proper defense in depth:
Handling Security Errors Gracefully
Production systems must handle security errors without exposing sensitive information. Our implementation provides a smooth user experience while maintaining security:
async def process_secure_query(self, query: str):
    """Process user query with comprehensive error handling."""
    try:
        # Get AI response with available tools
        response = await self.openai_client.chat.completions.create(
            model="gpt-4",
            messages=[{"role": "user", "content": query}],
            tools=self.available_tools,
            tool_choice="auto"
        )

        # Handle tool calls with security checks
        if response.choices[0].message.tool_calls:
            for tool_call in response.choices[0].message.tool_calls:
                try:
                    result = await self.call_mcp_tool(
                        tool_call,
                        tool_call.function.name
                    )
                    # Process successful result

                except PermissionError as e:
                    print(f"Security error: {e}")
                    # Log for monitoring but provide generic user message
                    return "I don't have permission to access that information."

    except httpx.HTTPStatusError as e:
        if e.response.status_code == 401:
            # Token expired - refresh automatically
            print("Token expired, refreshing...")
            self.access_token = None
            return await self.process_secure_query(query)  # Retry with new token
        elif e.response.status_code == 429:
            # Handle rate limiting gracefully
            retry_after = int(e.response.headers.get('Retry-After', 60))
            print(f"Rate limited. Waiting {retry_after} seconds...")
            await asyncio.sleep(retry_after)
            return await self.process_secure_query(query)
        else:
            # Generic error for other cases
            print(f"HTTP error: {e.response.status_code}")
            return "I encountered an error processing your request."
This error handling strategy:
- Automatically refreshes expired tokens without user intervention.
- Respects rate limits with appropriate backoff.
- Logs detailed errors for monitoring while showing generic messages to users.
- Prevents information leakage that could help attackers.
Testing the Secure Integration
Comprehensive testing validates that all security layers work correctly:
async def main():
    """Demonstrate the secure OpenAI MCP client."""
    # Verify OAuth server availability
    print("Checking OAuth server...")
    try:
        async with httpx.AsyncClient(verify=False) as test_client:
            response = await test_client.get(oauth_url)
            print("OAuth server is accessible")
    except Exception as e:
        print(f"OAuth server is not accessible: {e}")
        return

    # Initialize secure client
    client = SecureOpenAIClient(oauth_config)

    async with client:
        # Connect with full security
        print("Connecting to secure MCP server...")
        await client.connect_to_secure_mcp_server()

        # Test different permission scenarios
        test_queries = [
            ("Look up customer 12345", ["customer:read"]),
            ("Create a high-priority support ticket", ["ticket:create"]),
            ("Calculate total account value for customer 67890", ["account:calculate"])
        ]

        for query, expected_scopes in test_queries:
            print(f"\nTesting: {query}")
            print(f"  Required scopes: {expected_scopes}")
            response = await client.process_secure_query(query)
            print(f"  Response: {response}")
This testing approach verifies:
- OAuth server connectivity
- Token acquisition and refresh
- Scope-based permission enforcement
- Error handling for various scenarios
Production Deployment Considerations
Deploying this secure system to production requires attention to several critical factors:
Environment Configuration
Store all sensitive configuration in environment variables or secure vaults:
# Production environment variables
export OAUTH_CLIENT_ID="openai-mcp-prod"
export OAUTH_CLIENT_SECRET="<from-secure-vault>"
export MCP_SERVER_URL="https://mcp.example.com"
export SSL_CERT_FILE="/etc/ssl/certs/ca-certificates.crt"
Architecture for Scale
Production deployments typically involve multiple client instances:
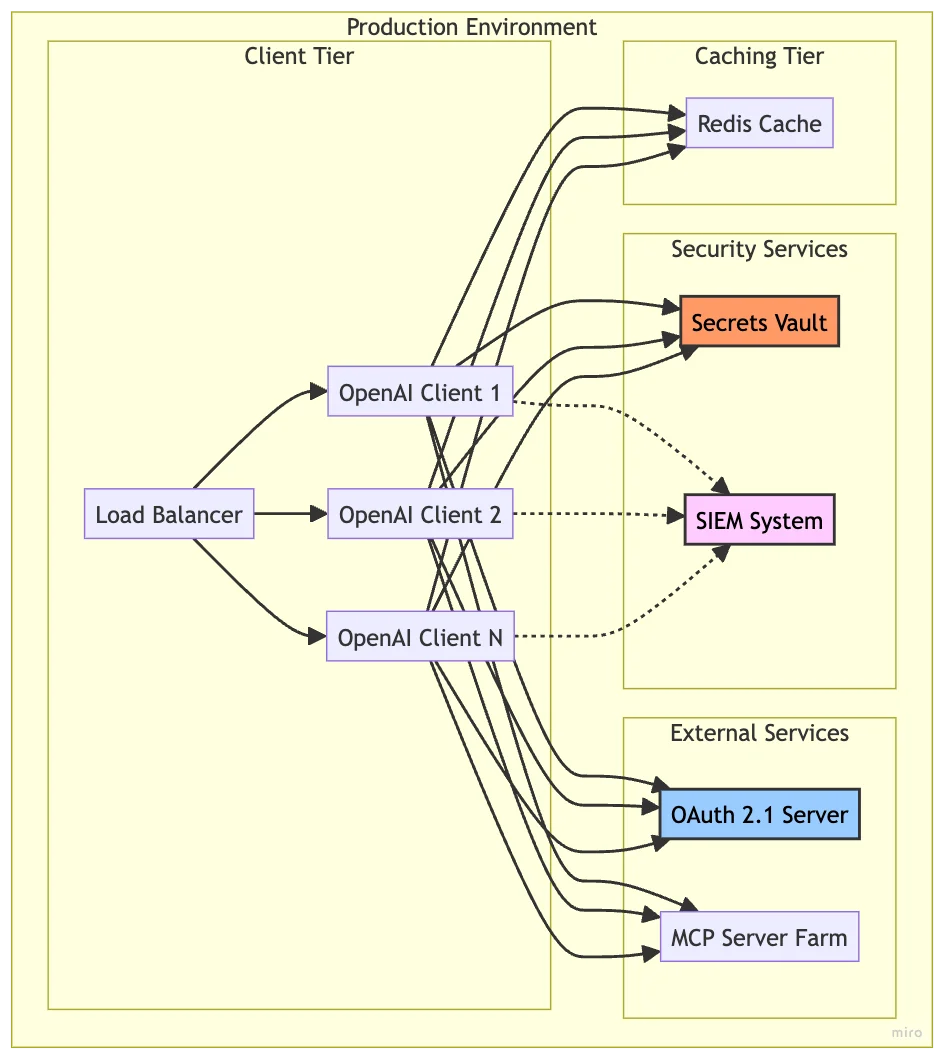
Key Production Considerations
- Token Caching: Use Redis or similar for shared token caching across instances
- Certificate Management: Implement automated rotation with Let's Encrypt or similar
- Monitoring: Log all security events to a SIEM system for analysis
- Rate Limiting: Implement client-side rate limiting to complement server controls
- High Availability: Deploy OAuth servers and MCP servers with redundancy
- Secrets Management: Use HashiCorp Vault or AWS Secrets Manager for credentials
Try Out the Examples
Development Setup (Local Python)
- Clone the repository:
git clone git@github.com:RichardHightower/mcp_security.git
- Copy
.env.exampleto.envand configure your environment:
cp .env.example .env
Edit
.envto configure security and LLM provider:- Set your OAuth configuration
- Add your API key for OpenAI
- Configure Redis URL if using distributed rate limiting
- Set TLS certificate paths
Run the setup tasks:
task setup          # Install Python dependencies
task generate-keys  # Generate RSA keys for JWT
task generate-certs # Generate self-signed certificates
Docker Deploy Setup
- Clone the repository:
git clone git@github.com:RichardHightower/mcp_security.git
- Copy
.env.example.tlsto.envand configure for Docker:
cp .env.example.tls .env
Edit
.envto configure your production environment:- Set your API keys (OPENAI_API_KEY, ANTHROPIC_API_KEY)
- Configure JWT secrets and OAuth credentials
Run the Docker setup:
task setup          # Install Python dependencies
task generate-keys  # Generate RSA keys for JWT
task generate-certs # Generate self-signed certificates
task docker-build   # Build Docker images
task docker-up      # Start all services with TLS
The code for OpenAI and secured MCP is under src/secure_clients/openai_client.py.
Conclusion: Security as a Foundation, Not an Afterthought
Securing OpenAI's integration with MCP servers requires thinking beyond simple API keys. We create a system worthy of enterprise trust by implementing OAuth 2.1 for dynamic authentication, JWT validation for cryptographic verification, scope-based permissions for granular access control, and TLS encryption for transport security.
This implementation proves that security does not have to compromise functionality. Your OpenAI-powered applications can maintain their powerful capabilities while adding protection suitable for production deployments. The dual-validation approach, checking client-side and server-side permissions, creates defense in depth that can withstand various attack vectors.
Remember: security is not a feature to bolt on later; it is a fundamental design principle that should guide every architectural decision. The patterns demonstrated here provide a solid foundation for building AI systems that are both powerful and protected.
As you implement these patterns in your systems, consider security not as a barrier to innovation but as an enabler of trust. When users know their data is protected, they are more willing to embrace AI's transformative potential.
For the complete implementation with runnable examples, explore the mcp_security repository on GitHub.
About the Author
Rick Hightower brings extensive enterprise experience as a former executive and distinguished engineer at a Fortune 100 company, where he specialized in Machine Learning and AI solutions to deliver intelligent customer experiences. His expertise spans both theoretical foundations and practical applications of AI technologies.
As a TensorFlow-certified professional and graduate of Stanford University's comprehensive Machine Learning Specialization, Rick combines academic rigor with real-world implementation experience. His training includes mastery of supervised learning techniques, neural networks, and advanced AI concepts, which he has successfully applied to enterprise-scale solutions.
With a deep understanding of both business and technical aspects of AI implementation, Rick bridges the gap between theoretical machine learning concepts and practical business applications, helping organizations leverage AI to create tangible value.
Follow Rick on LinkedIn or Medium for more enterprise AI and security insights.
Discover AI Agent Skills
Browse our marketplace of 41,000+ Claude Code skills, agents, and tools. Find the perfect skill for your workflow or submit your own.