Quick Start Guide
Get up and running with Skilz in just a few minutes. This guide covers installation and basic usage to help you install your first AI skill.
Step 1: Install Skilz
First, install Skilz using pip. Skilz requires Python 3.10 or higher.
pip install skilzVerify the installation:
pip install skilzskilz --version Tip: If you prefer isolated installations, use pipx install skilz instead.
Step 2: Browse Skills
Visit Skillzwave.ai to browse the skill marketplace. Each skill page shows the install command you need.
For example, to install the Skill Development skill:
pip install skilzskilz install anthropics/claude-code/skill-developmentStep 3: Install Your First Skill
Let's install a skill. Run this command:
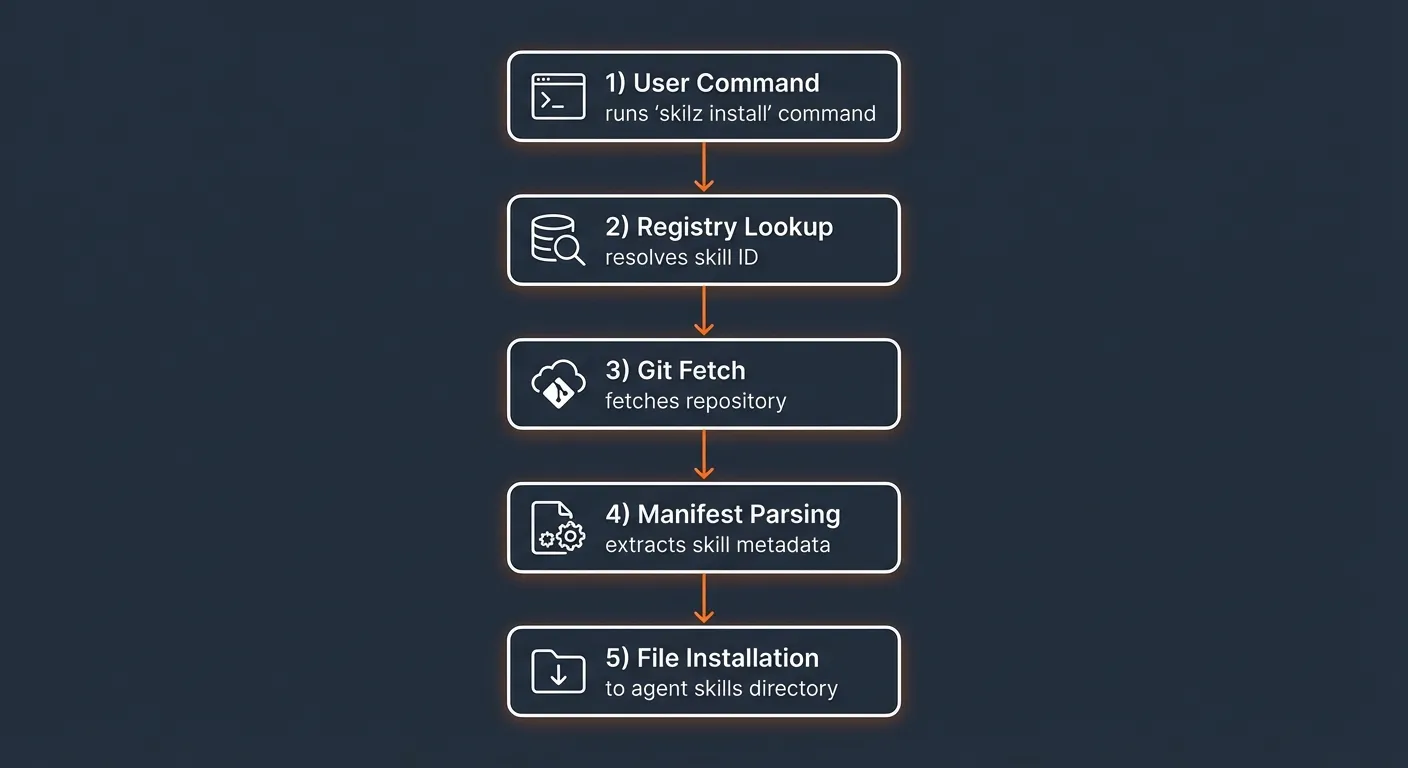
pip install skilzskilz install anthropics/claude-code/hook-developmentThis command:
- Resolves the skill from the registry
- Downloads the skill files from GitHub
- Installs to the default agent (Claude Code)
- Creates a manifest to track the installation
Step 4: Verify Installation
List your installed skills:
pip install skilzskilz listYou should see output like:
Installed Skills (claude)
========================
  hook-development  anthropics/claude-code/hook-development  v1.0.0  abc1234
Common Commands
Here are the most commonly used Skilz commands:
pip install skilz# Install a skill (NEW format - recommended)
skilz install owner/repo/skill
# Examples
skilz install anthropics/claude-code/skill-development
skilz install davila7/claude-code-templates/slack-gif-creator
# Install for a specific agent
skilz install anthropics/claude-code/skill-development --agent opencode
skilz install anthropics/claude-code/skill-development --agent gemini --project
# Install at project level (in current directory)
skilz install anthropics/claude-code/skill-development --project
# List installed skills
skilz list
skilz list --agent opencode
skilz list --project
# Update all skills to latest versions
skilz update
# Remove a skill
skilz remove anthropics/claude-code/skill-development
# Read skill content (for agents without native skill loading)
skilz read skill-developmentUnderstanding Skill IDs
Skill IDs use the format owner/repo/skill where:
- owner is the GitHub username or organization
- repo is the repository name
- skill is the skill identifier within that repository
Example Skill IDs (NEW Format)
anthropics/claude-code/skill-development— Skill Development from anthropics/claude-code repoanthropics/claude-cookbooks/analyzing-financial-statements— Financial analysis skilldavila7/claude-code-templates/slack-gif-creator— Slack GIF creator skill
Legacy Format: The old format owner_repo/skill (with underscore) is still supported for backwards compatibility.
Installing for Different Agents
Skilz supports 22+ different AI coding agents. Use the --agent flag:
pip install skilz# Install for different agents
skilz install anthropics/claude-code/mcp-integration --agent claude # Claude Code (default)
skilz install anthropics/claude-code/mcp-integration --agent opencode # OpenCode
skilz install anthropics/claude-code/mcp-integration --agent codex # Codex
skilz install anthropics/claude-code/mcp-integration --agent gemini --project # Gemini CLI
skilz install anthropics/claude-code/mcp-integration --agent copilot --project # GitHub Copilot
skilz install anthropics/claude-code/mcp-integration --agent cursor --project # CursorSee the Supported Agents guide for the complete list and agent-specific instructions.
User vs Project Level
Skills can be installed at two levels:
User Level (Default)
Installed to ~/.claude/skills/ (or equivalent for other agents).
Available globally for all your projects.
skilz install anthropics/claude-code/skill-developmentProject Level
Installed to ./.claude/skills/ in the current directory.
Useful for project-specific skills or sandboxed environments.
skilz install anthropics/claude-code/skill-development --projectNext Steps
Now that you have Skilz installed, explore these resources:
- Command Reference — Full documentation of all commands
- Configuration Guide — Customize Skilz behavior
- Supported Agents — Agent-specific setup instructions
- Browse Skills — Find skills to install
Need help? Check the Troubleshooting Guide or open an issue on GitHub.